How to Integrate Lutron Aurora Dimmers With Home Assistant
Contents
My first goal with Home Assistant was to create the perfect lighting setup for our house. A big part of that goal was making the smart lights fade into the background by working with wall dimmers as a normal person would expect.
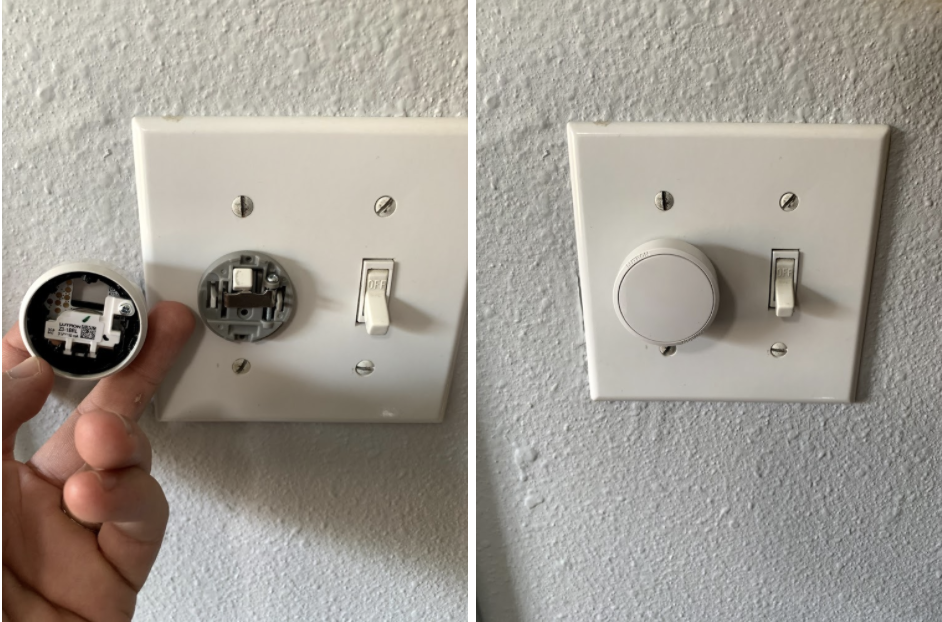
Lutron Aurora dimmers fulfill this need perfectly. By locking your wall switch in the on position, they turn your dumb switch into a smart dimmer and switch without any additional electrical retiring.
By default, they’re designed to work with the Hue bridge. Setting them up with the Hue bridge is very straightforward.
However, I wanted to use the dimmers to trigger the Circadian Lighting component and other features of Home Assistant. Unfortunately, the Home Assistant Hue integration doesn’t work quickly enough with these dimmers (or any switches) because it relies on polling.
As a result, there’s an intolerable delay between pressing the dimmer and the lights changing when you use Home Assistant.
Fortunately, as with all Hue bridge products, the dimmers use the Zigbee protocol. Therefore if we add a Zigbee modem to our Home Assistant’s setup, we can pair the dimmers directly to Home Assistant and use its wonderful automation to do anything we like with our dimmers, including controlling non-Hue smart plugs, setting scenes in a room, and even triggering Circadian Lighting changes without any delay.
Here’s how.
Setting up Zigbee with Home Assistant
First, we need to add a Zigbee modem to our Home Assistant setup. That requires some additional hardware, namely a Zigbee receiver. There are lots of options out there, but I settled on the Conbee II USB Zigee receiver.
Conbee II
The Conbee II is just an antenna for Zigbee. And like all antennas, it has to cope with electrical interference and range to be effective. As such, we can’t just plug the Conbee II USB stick directly into the Raspberry Pi’s USB port.
There are a lot of electrical signals running through your Home Assistant’s Raspberry Pi constantly, and these signals can interfere with the antenna’s ability to receive Zigbee communication waves.
To decrease that interference, I used a 3.3ft USB extension cord. (There are some trade-offs with the lengths of the USB extension cord, so I experimented with different lengths and 3.3ft seemed to be just right)
Alose, like all antennas, you also want your Conbee II to be high and uncovered, so I used the USB extension cord to raise it up.
ZHA
Once you have your Conbee II plugged into you’re Raspberry Pi and positioned appropriately, you’ll need to set up the ZHA integration in Home Assistant. Follow the instruction here.
Note: you could use other Zigbee integration like deCONZ. I just found ZHA is easiest.
Pairing Lutron Aurora dimmers with Home Assistant Zigbee
Now that you have your ZHA and Conbee II set up and ready to receive Zigbee signals, we have to pair the Lutron Aurora dimmers with our newly minted Home Assistant Zigbee modem.
First, put the ZHA into pairing mode by going to the ZHA integration, clicking
CONFIGURE, and clicking the + button in the lower right corner. Click
SHOW LOGS in the upper so we can see whether or not our pairing is working.
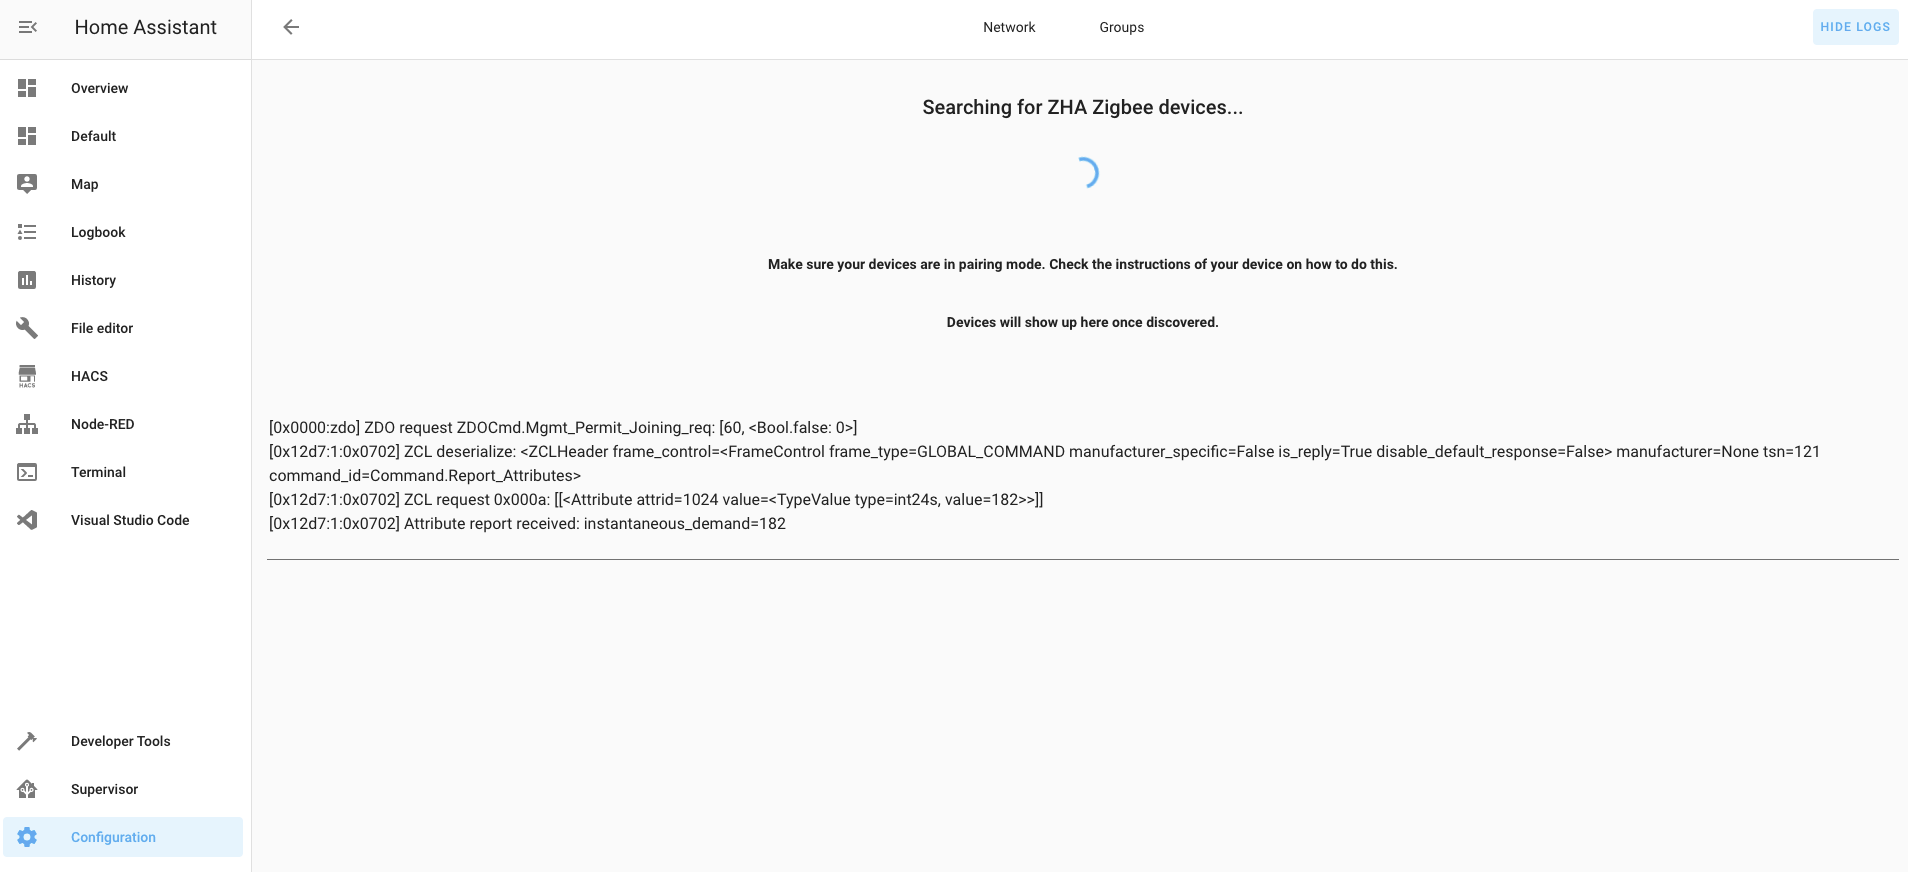
Once ZHA is in pairing mode, simply double-tap the Lutron Aurora dimmers. You should see a blue light flash on the dimmer, indicating that it’s in pairing mode.
After about 10 seconds or so you should ZHA should show that it’s paired with the dimmer.
Usually, this should work without it a hitch. However, if you have previously paired your Lutron Aurora dimmers with the Hue bridge (or after a failed pairing with Home Assistant), you’ll have to reset the dimmer.
To do so, follow the instructions here. Once complete, try the pairing instructions above again.
Using Lutron Aurora dimmers with Home Assistant
Now that we have our Lutron Aurora dimmers paired with Home Assistant, we can start using them.
First, you’ll notice that when you pair the Lutron Aurora dimmers the only device ZHA creates is a battery for the dimmer. That’s because ZHA expects you to use events, not devices for automation triggers.
To see what the events look like, go to Developer Tools -> EVENTS -> scroll
down to Listen to events enter zha_event, and press START LISTENING.
Click the dimmer button and you’ll see an event like this.
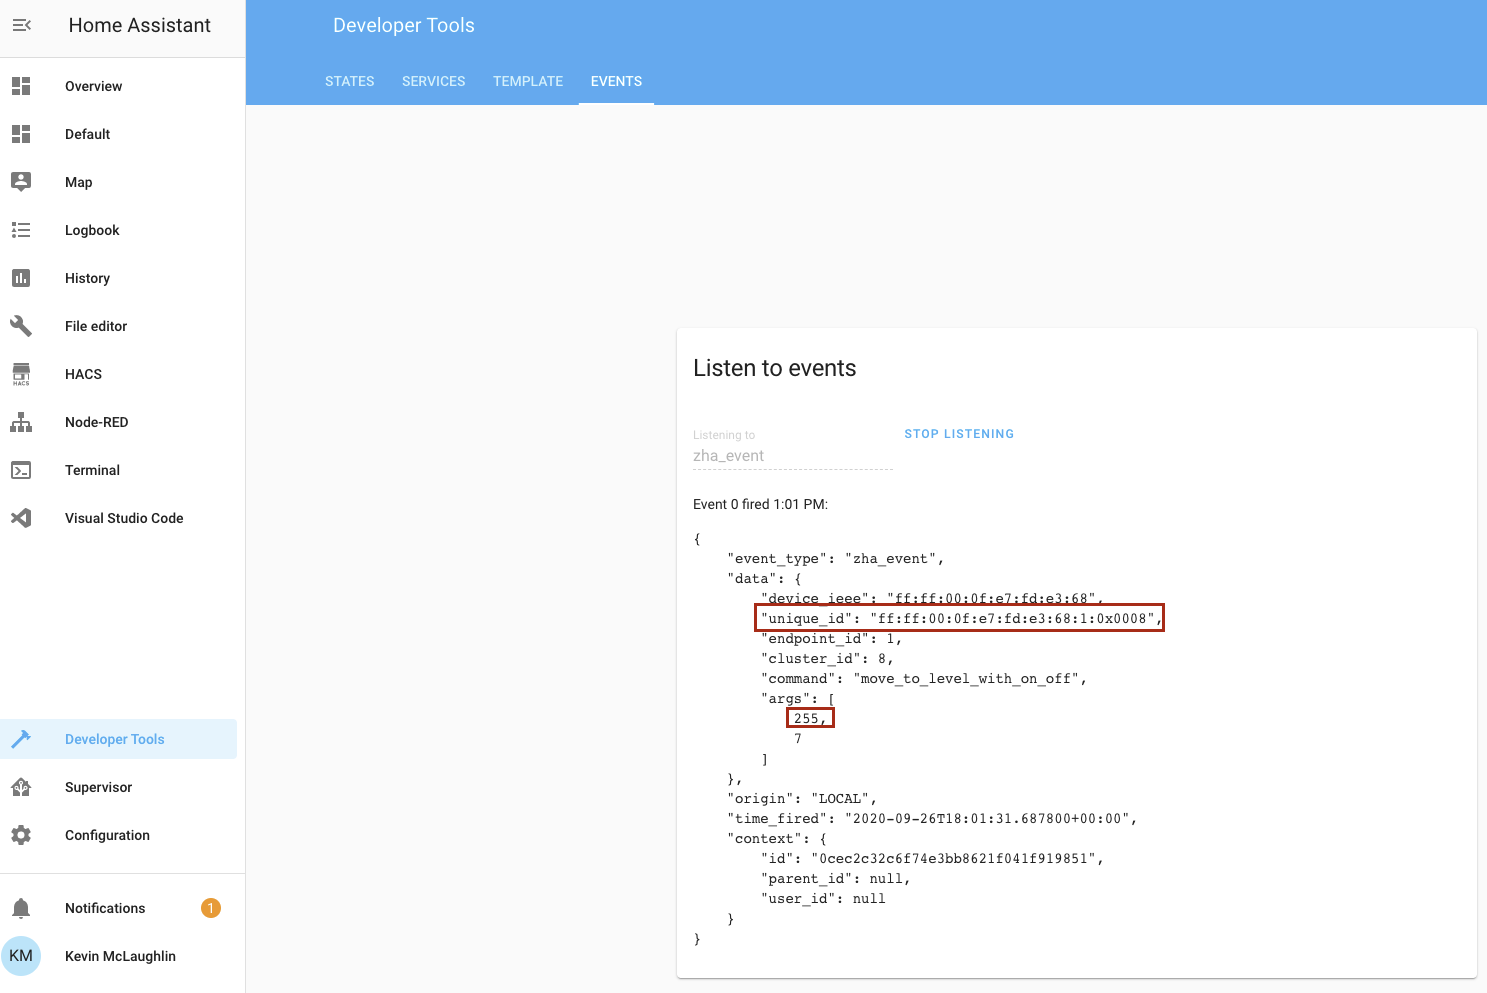
You’ll notice that there’s a unique_id that you can use to distinguish one
dimmer from another.
You will also see that the status of the dimmer is stored as a number in the
first element of the data.args array.
Clicking the dimmer toggles the number between 0 and 255.
Turning the dimmer’s dial moves the number between 1 and 255, which we’ll to set the brightness of our lights.
Use these events as triggers to Home Assistant automations, or, my recommendation, in Node Red flows like so.
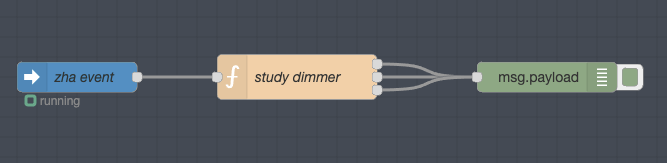
The top output of the study dimmer function node fires when the dimmer button
is toggled. The second fires when it’s dimmer, and the third when the zha_event
doesn’t match our dimmer’s unique_id.
[
  {
    "id": "1e645abc.0523b5",
    "type": "tab",
    "label": "Flow 1",
    "disabled": false,
    "info": ""
  },
  {
    "id": "7d1f7c3a.bc2984",
    "type": "server-events",
    "z": "1e645abc.0523b5",
    "name": "zha event",
    "server": "3b276be2.e89754",
    "event_type": "zha_event",
    "exposeToHomeAssistant": false,
    "haConfig": [
      { "property": "name", "value": "" },
      { "property": "icon", "value": "" }
    ],
    "waitForRunning": true,
    "x": 100,
    "y": 320,
    "wires": [["f7cf9dcf.11706"]]
  },
  {
    "id": "f7cf9dcf.11706",
    "type": "function",
    "z": "1e645abc.0523b5",
    "name": "study dimmer",
    "func": "var dimmerId = \"ff:ff:00:0f:e7:fd:e3:68:1:0x0008\"\nvar eventId = msg.payload.event.unique_id;\nvar state = msg.payload.event.args[0];\nvar onOrDimmed = msg.payload.event.args[1];\nif (eventId == dimmerId){\n    if (onOrDimmed == \"7\"){\n        return [msg,null,null];\n    }\n    else{\n        msg.payload.dimmerNumber = state;\n        return [null,msg,null];\n    }\n}\nelse{\n    return [null,null,msg];\n}",

    "outputs": 3,
    "noerr": 0,
    "initialize": "",
    "finalize": "",
    "x": 320,
    "y": 320,
    "wires": [["fef6d316.3cebe"], ["fef6d316.3cebe"], ["fef6d316.3cebe"]]
  },
  {
    "id": "fef6d316.3cebe",
    "type": "debug",
    "z": "1e645abc.0523b5",
    "name": "",
    "active": true,
    "tosidebar": true,
    "console": false,
    "tostatus": false,
    "complete": "false",
    "statusVal": "",
    "statusType": "auto",
    "x": 570,
    "y": 320,
    "wires": []
  },
  {
    "id": "3b276be2.e89754",
    "type": "server",
    "z": "",
    "name": "Home Assistant",
    "addon": true
  }
]
Here’s the key javascript from the function node.
var dimmerId = "ff:ff:00:0f:e7:fd:e3:68:1:0x0008";
var eventId = msg.payload.event.unique_id;
var state = msg.payload.event.args[0];
var onOrDimmed = msg.payload.event.args[1];
if (eventId == dimmerId) {
  if (onOrDimmed == "7") {
    return [msg, null, null];
  } else {
    msg.payload.dimmerNumber = state;
    return [null, msg, null];
  }
} else {
  return [null, null, msg];
}
Extending the range
After I set up my dimmers, I discovered that the range of the Conbee II couldn’t reach the far end of my house. Specifically, it couldn’t go through the bathroom.
Fortunately, Zigbee is a mesh network. That means the network range and strength actually gets better as you add more devices. However, battery-powered devices like dimmers don’t actually improve the network’s range. You have to add “always-on” devices like plugs or lightbulbs. (The Hue lightbulbs won’t work in this case because they’re connected to the Hue bridge, which is a different Zigbee network then our Home Assistant Conbee II)
To improve the range, I recommend ZHA buying some Zigbee outlets like these by Innr and placing them between the areas of your house that are out of range and the Conbee II. Two strategically placed outlets completely solved my problem.
Conclusion
The Lutron Aurora dimmers are simply the best piece of hardware I’ve found for creating an intuitive yet powerful lighting set up.
However, they’re very limited with their default Hue integration. Thankfully, adding them to Home Assistant makes it easy to create advanced integrations and automations.